How the 3NPS-Modes System can help you harmonize a Blues Pentatonic lick

How the 3NPS-Modes System can help you harmonize a Blues Pentatonic lick

Harmonisations are pretty cool, I know. Playing a melody and then adding the 3rd degree to it, to make it sound bigger or give it more impact is a great way of adding a special... note (no pun intended) to your music.

Instead of explaining how to harmonise a melody using the 3NPS Modes both in the basic melody and in the harmonisation, I want to show you here, how to harmonise a Pentatonic Lick.

Getting a simple shift to create harmonies

There are a few things to consider, when harmonising pentatonic sequences or licks, in comparison to harmonising melodies using the modes and the 3NPS Scale Patterns, where you just need to shift upwards 2 positions, to get a simple harmony.

With the pentatonic scales, this does not work so smoothly.

You can try to play a little pentatonic melody and then play the same pattern in the next or second next pattern on top of it, it will most likely not sound as pleasing as you expected. Although it also works. Kinda.

So, what do we do instead?

How to make this work

Take a random pentatonic sequence. Make it short for now.

When you got clear on what notes you want to play, translate the same lick into a modal lick with the help of the 3NPS system. You will probably skip a few notes here and there and that is intended.

Then: move up a 3rd, while staying in key. So, depending on your starting note, it can be a minor or major third and play the same structure in the modal pattern.

Here is an example.

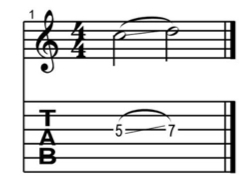
The pentatonic lick goes as following:

simple pentatonic lick.png

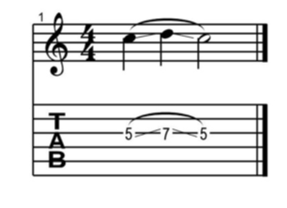
The next thing to do, is to translate it into a 3NPS Pattern:


pentatonic as 3NPS  lick .png

Pay close attention to the fingering and how it stays consistent with the Aeolian Pattern.

Now we shift everything into the Ionian pattern and it turns out like this:

harmonising pentatonic lick.png

Notice, that, if you strictly stay in the Ionian pattern and stick to the fingering, you would need to play the notes 5, 6 and 7 in the same fret but with different fingers. That can become a bit uncomfortable.

So, what other solutions do we have?

I suggest playing them both with the same finger, either the pinkie finger or the ring finger and using the rolling technique, that you might be familiar with from playing arpeggios.

Now, go and get creative yourself, do not judge your work in the beginning, just get going with something and experiment around for a while! Always stay curious.

About the author:

Michael Korte teaches kitaratunnit in tampere , Finland, and is passionate about showing his students ways to improve their playing and creativity.

He focuses on combining technique, theory and creativity into one big picture, so that his students can become balanced guitar players and play as best as they can at any time.

How to play the “Legato Slide”

How to Play “Legato Slide”

Legato is a technique which enables you to play notes without using your picking hand, by purely playing using your fingers on your fretting hand.

Because you only need to be focused on one hand, you don't need to be worry about two hand synchronisation and therefore legato enables you to achieve faster speeds in your guitar playing much more easily. And also a smoother sound - hence the word legato.

One way of playing legato is what is called the “legato slide”. A legato slide is being played by hitting the “starting pitch” with your pick and then you slide - with the same finger you have fretted the starting note – across the guitar neck to the target note.


Ex. 1:

Example 1


In the first example you are seeing an upwards slide, starting from the 5th fret of the G string and ending on the 7th fret on the same string.


I've laid out 4 steps for you witch you should follow, in order to master the legato slide:

1.)  Let the starting note ring out cleanly and hit the string hard enough, so that the note is sustaining long enough and doesn't get lost by applying the slide.

2.)  Focus your eyes already on the target note before you play the slide. This will make it much more easy for you to hit the right string.

3.)  Play the slide in a speed which will help you hit the target note cleanly, so that it still rings after you hit the target note with the slide.

4.)  Practice the slide with all 4 fingers, one after the other.

Variations:

 There are several variations on how you can play the legato slide, here are the most important ones:

Ex. 2:                                             

example 3

The second example shows you a downwards slide. You play it by hitting the starting note, like you did with the upwards slide, but this time you are sliding downwards to the target note instead.

Ex. 3:                                            

Picture 2.png

Example 3 shows you an upwards-downwards slide. It is played in the beginning like the upwards slide, by hitting the starting note with your pick and sliding up to the first target note. After hitting the first target note you are then sliding down again - without hitting the string again with your pick - to the second target note (witch is the starting note in this example).

Ex. 4:

Example 4

Example 4 shows you a downwards-upwards slide. It is played in the beginning with the downwards slide, by hitting the starting note with your pick and sliding down to the first target note. After hitting the first target note you are sliding up again - without hitting the string again with your pick - to the second target note (witch is the starting note in this example).

Now that you've learned how to play legato slides and their variations, you may want to use them creatively in your playing. Just try to implement this technique into the music you are already playing, to make it sound more interesting!


This article was written by Marco von Baumbach, guitar teacher in Wuppertal, Germany.

Becoming a Musical Jedi

Becoming a Musical Jedi

I remember hearing John Lennon talk about meeting Chuck Berry, who had been his idol for many years prior.  I can’t find the exact quote, but John said something to the effect that it was not necessary to put him on a pedestal; that he, legend though he was, was just a regular person like you and I.  

Putting musicians on pedestals

Master musicians don't put other musicians on a pedestal.  They realize there is no pedestal. The higher the level of mastery, the more humble you get.  But it’s not a humility that in any way diminishes one’s self.  A master recognizes that their abilities are the result of long, hard work, but also recognizes that it was work that they felt compelled to do.  They feel a sense of accomplishment but also recognize that it is the spirit of the music itself working through them.

Thus, the master musician takes pride in their actions, but not in the usual sense of the word.  Pride can sometimes have negative connotations, as in when it is false aggrandizement of the ego.  True pride is recognizing that one deserves success for massive amounts of action taken, yet also realizes a greater force at work than one’s need for recognition.  In the case of the musician, it is the force of the music. In life, it could just be called the Force.

How is it like becoming a Jedi?

Becoming a master musician is like becoming a Jedi.  The ultimate goal is for the spirit of the music to flow through you automatically.  In order for this flow to happen, one must study and train for many, many years. Perhaps when we first begin training to be a Jedi or anything else in life, we have no idea of the depth of commitment involved, but we get rewarded every step of the way by gaining self-mastery, ability to help people, power, poise etc.

Many students tell me they have no desire to become professional musicians, and that is perfectly fine. But even if you have no desire to become a musical Jedi, taking music lessons, even for a short time, is beneficial.  In fact, learning directly from a master is way faster than trying to learn on your own by reading, studying, observing and trial and error. One day with Obi Wan Kenobi could potentially be worth more than 10 years of studying the Force on your own.  Just think what 10 years with Obi Wan could do for you!

The Flow of Life is in everything we do.  Masters are often treated as if they have super-human powers; yet their achievements simply reflect the fact that they have concentrated the flow in a particular area for a long time.  Whatever you put your attention on expands that area of attention. Masters, recognizing that this is the case for everyone universally, know that there is nothing special about them.

True mastery

True self-masters also recognize the mastery within everyone.  The job of a music teacher is to help others become the master they want to be, even it that simply means a master hobbyist.  In this case a master hobbyist is one who can enjoy their instrument virtually every time they play for years to come, regardless of the amount of ‘progress’ necessary for that enjoyment to be sustained long-term.  

Becoming a true master of music

The master is never annoyed by a student’s lack of ability.  

All a master sees is mastery.

The only annoyance to a master teacher is arrogance, wherein someone tries to convince himself and others that they are further along than they are, and the learning process becomes thwarted.  But even then, the master knows that the attitude is just a facade, and that that person is a master too, they just haven't put their focus ahead of their desire for self-aggrandizement.

Everything you learn, everything you do to better yourself on your instrument, is a step in the process of mastery.  You don’t have to become a full-time professional musician to access mastery. You already have it, deep within you. Go forth, young Padawan, make good music, and may the Force be with you. :)

About the author:

Dennis Winge is a professional guitarist living in New York with a passion for vegan food and bhakti yoga.  If you are interested in taking Guitar Lessons in Ithaca, NY, then be sure to contact Dennis!


Ear Training And Improvising Essential

Improvising sounds very intimidating to most who haven't done it before.

For those who have they often just get stuck in the small box of noodling up and down scales.

This method of course sounds minimally musical, but is a little fun when first starting out. This method is similar to a baby making noises when learning to talk. It's very fun and exciting to be able to mimic those you look up to.

Mimicking to help you with your improvisation

This stage is important because it means you are taking small "baby" steps. Small steps will get you a lot further than no steps.  

Please don't take it as a negative that I am relating it to a baby talking. Ask any parent who has witnessed the first words of their child as they attempt to mouth out the sounds. Sure it is unorganized and sounds like gibberish, but the parent is also ecstatic. This is how I feel when I see students who begin to take steps outside their comfort zone and being improvising. Another important thing to remember is that this stage requires virtually zero prior knowledge or skill.

Improvisation with zero prior knowledge 

Many don't even realize there is so much more to improvising. To begin moving beyond the basic noodling stage, let’s look at how we can not only begin to improvise if we have never done it before, but also how we can develop our ability to create beautiful original melodies seemingly out of thin air. And no we aren't going to be learning "licks".

 Minor Pentatonic Scale

The primary thing we need to start is the minor pentatonic scale. This is a simple 5 note scale that sounds great. We next need to be able to hum along to the scale. For some, like myself, when first trying this you might be totally unable to hum a single note accurately. This is fine, it will take some work, but I was able to learn to do it and have taught many others to get this skill learned as well. It does help if you have a great guitar teacher to help with this.

 Exercise for you to try

Once you have the scale memorized and can play it and hum along to it, we will learn the notes. For now, don't worry about what the notes are, just focus on how they sound. Here are what you will call the notes.


1st note = 1

2nd note = minor 3

3rd note = 4

4th note = 5

5th note = minor 7

The sound of moving from a 1 to a minor 3 is like the beginning notes of Seven Nation Army or Smoke On The Water. This is 3 frets higher than the 1st note. Whenever you move 3 frets higher it has this sound. This is what we want to get familiar with. To know this sound and how it feels. It is sad, yet pretty cool sounding. We will then get used to moving from the 1 to the 4, then 1 to 5, then 1 to minor 7. These all have specific feelings and all together have a specific feeling that we have grouped together and called the minor pentatonic scale.  


Begin working on this for about 5-10 minutes every day. This will not only benefit your improvising, but most everything else you will ever do on guitar.


About The Author: Ryan Duke is a professional musician, guitar teacher, and owner of Seattle Guitar Mentor providing Franklin Guitar Lessons.

What Pick Should I Use?

When you are beginning guitar, picks can be a bit confusing.  There are thick ones, thin ones, various sizes and shapes, finger picks, thumb picks, metal picks,  plastic ones and the list goes on and on. 

Here are some guidelines to help you understand the different types and help you choose and find what works best for you.

Right or wrong with regards to picks

First, there is no right or wrong when it comes to picks.  People have various preferences and there are great players that like all sorts of different things including no pick at all.  You will find what works best for you over time especially if you experiment with different things.

The most common picks

The most common picks are the teardrop shape flat picks that you can find at any music store. Flat picks are just that - flat - as opposed to finger or thumb picks which literally wrap around your fingers/thumbs.  There are various brands including Fender, Dunlop and many others.  This common teardrop shape is a good place to begin. 

These picks are commonly used for picking single note leads and also for strumming chords.  There are various thicknesses and you can ask someone in a music store to try different ones to see how they sound and feel. 

In general thicker ones give a warm tone and are generally preferred for lead playing and also sound great for strumming.  Thinner picks with more flexibility have a thinner, some would say tinny, sound but can sound rich and nice for strumming - they are generally not as good for lead work as the flexibility causes bending of the pick which slows down picking speed. 

I personally have preferred thicker picks for quite a while but just recently started playing occasionally with thinner picks for some strumming and have found some nice tones.

Difference surfaces 

You’ll also discover that there are different surfaces to picks.  Dunlop and other brands often have picks that either have a matte type of finish or a grippy textured surface so that the pick doesn’t slip out of your fingers or move as much while playing.  This is usually quite helpful.

There are also larger triangular picks that I tend to favor - they are bigger than the typical teardrop shape and are great for lead playing and strumming. 

Research and Experimenting

If you begin to research and experiment you’ll also find that the tips of different picks are shaped differently - some are a very sharp triangle, others more rounded.  In general, the sharper the tip the more bright the tone and more rounded tips will give a warmer, more forgiving tone. 

How much do picks cost?  Well, when I was a kid, you could get quite a few for very little money.  Now, they’re much more expensive with good picks coming in packs of 6 or more and commonly costing $5-6.  There are also boutique pick brands that use aerospace plastics that virtually never wear out and have a very refined and subtle tone and they commonly cost $20 to $50 for 1 pick.  Yes, there are $50 picks out there - I have one and it’s fantastic and I’m obsessively careful to keep it in a special little tin so I don’t lose it.  That’ll be a bad day when I lose that one. 

Jazz Picks

There are also jazz picks which are smaller than the usual teardrop  and have a sharp tip - many players including some electric guitar wizards really like this size and shape - not my cup of tea but many love them.

And then there are thumb and finger picks which I use when I play my steel resonator guitar for slide.  Some finger picking guitarists use a thumb pick for regular steel string acoustic playing but that hasn’t worked well for me.

So, what should you do?  Start with inexpensive teardrop picks with varying thicknesses and then experiment with various shapes, sizes, materials, brands and just see what works for you.  It’s a fun and pretty cheap way to discover a whole world of different sounds with your guitar. 

Enjoy!

About Author

Andrew Bassuk teaches at Harmony Music Center in Ventura, CA and offers guitar and music instruction for kids, teens and adults.  For more info visit:  www.harmonymusiccenter.com

How To Stay Focused During A Guitar Workout

The Reasons Why You Are Not Growing As Fast As You Wish On Guitar

By Antony Reynaert

In your development as a guitar player it’s incredibly important to train yourself and your muscle memory the best way possible. When soccer players prepare for a game, they don’t just sit in the changing room analysing how they should play.

guitar lessons practising

No, you want to be prepared by training in a practical way. If you want to be a good guitar player, just like the ones you look up to, you have to train yourself and be extremely dedicated about it.

Committing to your guitar playing

A lot of guitar players don’t really pay much attention to being fully committed during a guitar training. They sit for example in front of the television playing their scales up and down or they’re just doing some random ‘noodling’ or improvisation on the guitar.

They just don’t realize that this won’t help you at all in your development. Nobody wants to walk in the same circle over and over and over again with no result.

Neglecting This Aspect During A Guitar Training Will Result In Slow Progress

If you train for example on playing a scale up and down with perfect technique, it’s vital that you stay focussed all the time. The moment you start losing attention, mistakes will slip into your playing.

The reason why this happens is simple; you incorporate these mistakes into your muscle memory so the next time you play you will make the same mistakes again. Being completely focused is such a crucial aspect to your guitar practice session.

Another thing that happens a lot during a training session is that you start slipping into random ‘noodling’ on guitar. In other words you get distracted from the real exercise and you just play some random improvisation.

This will also result into the number one thing you don’t want to happen: no progress at all. Again, there is only one aspect that is responsible for this distraction and it’s the lack of focus.

The Number One Key To Stay Focussed All The Time During A Guitar Training

Now that you realize that focus is the key to success for optimal growth as a guitarist, you want to maintain optimal attention during the whole guitar workout. To do so you only need one thing: an interval timer.

There are many apps for your phone that will provide you this interval timer. You can also go on YouTube and search for an interval timer. Not having a timer is absolutely no excuse for not using one during a training session.

The way to use this interval timer during a practice session for building guitar skills goes like this; set the timer in a way that it beeps every 3 minutes. Set the alarm not too loud so you won’t be bothered by the sound during your training.

Using Interval Timer

The next step is where this interval timer will become really valuable. Every time it goes off, you have to ask yourself: “What am I really doing right now?”. Reflect on what you are doing, on how you are doing and if you are focussed. Then continue the exercise with the highest intensity possible.

This method will avoid you from slipping into random noodling, will keep you focussed on the exercise and will maintain this focus during the whole training.

All the lost time from being not focussed will immediately go out the window now that you know about this simple but crucial aspect of using an interval timer in your practice sessions.

If you’re sometime clueless on what to play or what to practice, it’s a great time to dive into my free blues guitar ebook where I cover all aspects of blues rhythm guitar.


About the author


Antony Reynaert teaches blues guitar locally in Belgium as well as online. All his knowledge can be found on his website
The Best Blues Lessons For Guitar.